HOME EXTENSION.com
SUCCESSFULLY EXTENDING YOUR HOME
Drainage
1. Private Drainage – Septic Tanks and Cesspits
In remote rural areas without the luxury of public sewers, you traditionally had a simple choice when it came to dealing with foul waste: you had to either build your own private sewage works or be prepared to empty a lot of buckets.
The old-fashioned cesspool (or cesspit) comprised an underground chamber storage tank into which your foul ‘solids’ and ‘soil’ waste would be flushed. It would need to be located some way out in the garden (at least 7m away from the house). Construction would typically be the same as a manhole, of rendered brick walls on a concrete base, but with a reinforced concrete sealed lid for access.
The general idea is that, over time, the solid waste settles at the bottom and the relatively clear liquids are drained off safely into a handy nearby field by way of a land drain, rather like a soakaway. When full, cesspits require emptying by a suction tanker.
But in order to reduce the need for frequent emptying (and the associated cost) one popular illegal dodge was to wait until the District Surveyor had approved the new structure and safely departed, and then ‘accidentally’ knock out one of the bricks so fluids could seep away into the ground.
Perhaps it wasn’t fully appreciated that leaking cesspits had, not so long ago, been the cause of fatal cholera epidemics as a result of contaminated drinking water in nearby wells and streams.
Today, prefabricated plastic or GRP units are available, although cesspools have now largely been superseded by more sophisticated septic tanks.
Septic tanks work in a similar way to cesspools – the foul waste ‘solids’ settle over time with gravity, and are partially broken down by bacteria (under a scum or crust on the surface).
They are more efficient at separating the solid and liquid matters, employing a system of several chambers. The ‘refined’ liquid finally disperses into approved land drainage and percolates off into the ground. This process means that septic tanks can be smaller than cesspools and are cheaper to purchase.
The solid waste matter that cannot be broken down further by bacteria accumulates as sediment at the bottom of the chamber, so periodic emptying will also be required by a suction tanker, despite ambitious claims to the contrary from some proud owners!
The tank location must therefore allow sufficient access for the emptying truck, unless this is a DIY job that you particularly relish – in which case you may choose to recycle the waste, which by all accounts can make an excellent fertilizer. In Victorian times, the ‘nightsoilmen’ would empty privies in large towns to sell the contents for just such a purpose.
The nature of the subsoil is an important factor to consider when designing private drainage systems. For example, in clay soil the percolation rate may be poor and an extensive system of perforated pipes over a larger area may be needed. Because the discharge is not entirely pure, the installation must be approved by the Environment Agency as well by Building Control.
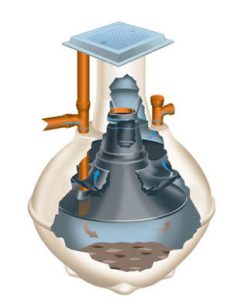
Today, more advanced large-volume septic tanks can be placed in an excavated pit just below ground level. These are environmentally friendly plastic or fibreglass units, some of which are effectively mini-sewerage treatment works that take the process one stage further, treating the liquid by-products so that they’re discharged as ‘clean’ water.
2. Traditional Pipe Materials
Clay
Most drains constructed up to the 1950s will be of fired clay, commonly in 100mm or 150mm (4in or 6in) diameters. These were traditionally salt glazed with a glossy, water-resistant finish. But the salt glaze manufacturing process caused vast amounts of pollution, so from the 1970s on clay pipes were no longer glazed and these have proved to be just as good.
The joints were caulked with hemp yarn and cement mortar forced into the sockets, which could seep inside (hence the old custom of dragging a ball of sacking through newly laid pipes). Such rigid joints are extremely susceptible to damage from ground movement. Clay pipes remain popular today because of their resistance to chemical attack and their modern flexible plastic couplings.
Concrete and cement fibre
Mainly used for ‘big bore’ underground pipes of 150mm diameter and upwards, the weakness of concrete pipes is their vulnerability to chemical attack from effluent on the inside (acids and sulphates) or from the surrounding groundwater outside. Concrete pipes were commonly jointed with cement mortar, which is unlikely to have remained watertight. Their use should be restricted to carrying rainwater only. Now mainly used for infrastructure projects and manufactured with protective coatings.
Asbestos cement
For generations, asbestos cement was a wonder-material (light, strong, cheap etc) that seems to have been used throughout the house, including soffits, flues, and even ceilings. More rarely, it even found its way into underground pipes. Unfortunately, it was soon discovered that asbestos pipes, like concrete, could deteriorate from attack by chemicals. Some lasted only six years before developing serious leaks. They must not be cut, drilled or disposed of without professional advice.
Very popular around the mid-1960s, there will be many existing installations with pipes made of flexible ‘pitch fibre’ or asbestos fibre impregnated with sticky black pitch (bitumen tar). Unfortunately these could sometimes be a little too flexible, being squashed into an oval shape by the weight above if not properly laid.
3. Constructing a new pre-formed concrete inspection chamber
Work starts by laying a 150mm thick concrete base onto which half-round open gulley pipes are laid. Any incoming branches joining the chamber are formed at a ‘streamlined’ angle – like an arrow – in line with the direction of flow.
Entry and exit pipes must be cut so they extend a little just inside the walls of the chamber before terminating, and are fitted with a flexible coupling to allow for settlement.
Next, dry-mix concrete is heaped around the base, and the first concrete section of the IC is placed in position. Make sure it is level on top and leave it to set. ‘Benching’ is formed over the surface of the base in concrete, sloping gently inwards from the level of the entry and exit pipes at a gradient of about 1: 12.
The surface of the benching should be topped with a 1: 1 sand / cement screed and then trowelled to form a smooth surface.
The remaining sections of the chamber are then placed on top, bedded in mortar to the required height. The finished structure should be surrounded with about 150mm of concrete. The top section is specially moulded to take the frame for the airtight lid. If your IC is located on a patio, a special recessed ‘self- fill’ lid can be fitted, and filled with matching patio slabs or tiles.
4. Building a soakaway
1. Excavate a hole of appropriate size (typically around 3 cubic metres) for the total roof area and volume of water discharged, located at least 5 m away from the foundations of the house and the boundaries, in accordance with advice from Building Control. In heavy clay soil a deep trench type soakaway may be suitable. Always oversize soakaways as they are prone to silt up over time.
2. Fill the soakaway hole up to the level of the trench with large pieces of masonry, rock or rubble (e.g. broken bricks & tiles, not sponge-like aerated concrete blocks) around the sides to prevent the sides caving in. Leave large gaps between the pieces as, when complete, these will need to fill with water prior to its final dispersal into the surrounding ground through natural seepage.
3. Place the end of the pipe so it discharges roughly into the centre of the soakaway. Then add more rubble to cover the pipe, except at the end of the pipe which must be left clear so that any debris carried in the water will fall down into the pit rather than accumulating at the point of discharge and blocking the pipe.
4. Backfill the pipe trench, first with gravel around the pipe, then soil.
5. Place about 100mm of gravel around the top of the soakaway. Cover this with a heavy-gauge plastic sheet prior to covering with at least 100mm of concrete ideally incorporating some form of inspection access. Finally, once the concrete has cured, it can be hidden with topsoil for plants and grass.
6. Finally, mark the soakaway location on your plans for future reference.


